Exchange Server Backup, Restore, and Disaster Recovery


A few years ago several colleagues and I decided to write an Exchange Server 2016 book, but scheduling and bandwidth issues caused us to delay it until Exchange Server 2019. However, we soon realized we were simply too busy to commit the amount of time needed to properly see the book to its completion. As a result, I was left with a few chapters destined to die a slow death in a folder on my desktop. As an alternative to that grim scenario, I’ve decided to publish them on my personal website (with zero warranty or proper editing). As the topic relates to Exchange Server troubleshooting, I thought I would cross-post it here.

Also, if you enjoy the topic on Exchange Backup, Restore, & DR, checkout the Exchange Server Troubleshooting Companion now available for free on TechNet

Windows Server Essentials O365 Integration Errors


Here’s a quick post to describe an issue I didn’t see referenced anywhere else except for within forum replies.

Issue
A customer had Windows Server 2012 R2 Essentials configured with Office 365 Integration but noticed they were unable to make any changes to the integration (such as changing the Admin account or adding new users) and the Exchange Online-related status indicators in the Essentials Dashboard were not being displayed properly. The customer stated this issue happened once before but apparently resolved itself. However, in this case, functionality had been broken for several weeks before they decided to reach out to me.

Specifically, when running the O365 Integration wizard you would receive an error stating, “Cannot connect to Microsoft Online services…. Make sure that the computer is connected to the Internet and then try again.”

Resolution
I first looked under the C:\ProgramData\Microsoft\Windows Server\Logs folder within the SharedServiceHost-EmailProviderServiceConfig.log file for any Integration Tool errors.

The log revealed the following error messages:

BecWebServiceAdapter: Connect to BECWS failed due to known exception : System.ServiceModel.EndpointNotFoundException: There was no endpoint listening at https://bws902-relay.microsoftonline.com/ProvisioningWebservice.svc that could accept the message. This is often caused by an incorrect address or SOAP action. See InnerException, if present, for more details. —> System.Net.WebException: Unable to connect to the remote server —> System.Net.Sockets.SocketException: No connection could be made because the target machine actively refused

I was able to trace the error message to this Microsoft forum post where MVP Susan Bradley provided the resolution. In this case, the resolution was to navigate to the HKEY_LOCAL_MACHINE\SOFTWARE\Microsoft\Windows Server\Productivity\O365Integration\Settings registry key and delete or rename the “BecEndPointAddress” registry entry. This entry had a value of the application server referenced in the error message above (bws902-relay.microsoftonline.com). After restarting all the Windows Server Essentials services, O365 Integration was fully restored.

My theory as to why this occurred is the application server the key referenced became inaccessible for some reason. I would think this value should be a load balanced name and not an individual server name.

Missing Recipient Creation Permissions in ECP and Shell


Issue
Customer running Exchange 2016 RTM was unable to create Mail Contacts in the Exchange Control Panel (ECP) or Exchange Management Shell (EMS). When opening EMS, the New-MailContact cmdlet was not visible, which was an indicator that there was a Role-Based Access Control (RBAC) permissions issue. Within ECP, the Plus symbol was not visible.


Troubleshooting steps taken
Customer was using the Administrator account that was a member of the “Organization Management” RBAC default role group. We also tested with a new account that was also added to the “Organization Management” group and the issue persisted. We also experimented with adding the test account to all default RBAC role groups and the issue still persisted. We also had the customer update to Cumulative Update 6 and the issue still persisted.

At this point, I wanted to verify the cmdlets were still present and available on the system (trying to rule out an odd corruption issue) so I opened PowerShell and manually loaded the Exchange module (bypassing RBAC) by running the following command:

Add-PSSnapin Microsoft.Exchange.Management.PowerShell.SnapIn

The New-MailContact cmdlet was available and working. Therefore, I knew it was an issue with RBAC via Remote PowerShell (as locally loading the Exchange modules bypasses RBAC).

I ran the below command (Get-ManagementRoleEntry) to view which management roles were associated with the New-MailContact cmdlet:

Get-ManagementRoleEntry *\New-MailContact | Format-List

From the output I could see that the “Mail Recipient Creation” role contains this cmdlet (Management Role Entry is synonymous with cmdlet within the RBAC framework). I then ran Get-ManagementRoleAssignment cmdlet to  view all of the default assignments. I compared these to my lab environment and they all appeared correct. Therefore, I decided to test a manual assignment of the “Mail Recipient Creation” role to my test account by running the below command (New-ManagementRoleAssignment):

New-ManagementRoleAssignment –Name TestFix –Role “Mail Recipient Creation” –User TestUser

After logging into ECP with the TestUser account, I could now create mail contacts. After opening EMS with TestUser I could now view New-MailContact as an available cmdlet:


This told me that somewhere in the RBAC framework, the Mail Recipient Creation role was missing as an assigned role for the default role groups.

Resolution
I was unfortunately unable to find the root cause and due to time constraints we chose to implement a workaround by manually adding the Mail Recipient Creation role to the Organization Management and Recipient Management role groups by running the below commands:

New-ManagementRoleAssignment –Name OrgMgmtFix –Role “Mail Recipient Creation” –SecurityGroup “Organization Management”

New-ManagementRoleAssignment –Name RcptMgmtFix–Role “Mail Recipient Creation” –SecurityGroup “Recipient Management”

After running these commands and logging into ECP again with the Administrator account, we were then able to create Mail Contacts.

Jetstress – Too Many IOPS?


Symptom:
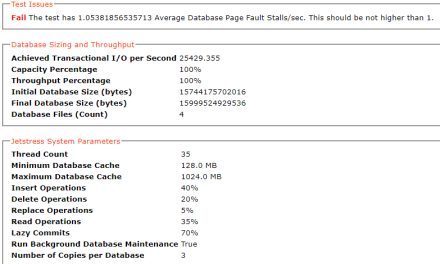
Customer reported Jetstress failures with the message, “Fail – The test has 1.05381856535713 Average Database Page Fault Stalls/sec. This should be not higher than 1.” The customer had recently purchased multiple servers to be used in an Exchange DAG and these Jetstress failures were halting the project. What was unique about this deployment is the customer was using all local SSD storage for the solution.

Analysis:
I asked the customer to provide their Jetstress configuration XML file as well as their Jetstress Results HTML file. As soon as I saw the results file I knew what the issue was, but only because I’ve had discussions with fellow Exchange MCMs, MVPs, and Microsoft employees who had encountered this same odd behavior in the past. In short, Jetstress was generating TOO many IOPS, as seen in the below output:

To the untrained eye this may not be anything special, but I had to do a double take the first time I saw this. Jetstress was generating over 25,000 IOPS on this system. Also impressive was the performance of the hardware as there actually wasn’t any disk latency issues from an IO read/write perspective:

As you can see from the above screenshot, database and log read/write latency (msec) was still fairly low for the extremely high amount of IOPS being generated. Yet our issue was with Database Page Fault Stalls/Sec, which should always remain below 1 (shown below):

Background:
Let’s spend some time covering how Jetstress is meant to behave, as well as the proper strategy for effectively utilizing Jetstress. Your first step in working with Jetstress should be to download the Jetstress Field Guide where most of this information is held.

The primary purpose of Jetstress is to ensure a storage solution can adequately deliver the amount of IOPS needed for a particular Exchange design BEFORE Exchange is installed on the hardware. You should use the Exchange Sizing Calculator to properly size the environment; using inputs such as # of mailboxes, avg. messages sent/received per day, and avg. message size. Once completed, on the “Role Requirements” tab you will find a value called “Total Database Required IOPS” (per Server) which tells you the amount of IOPS each server must be able to deliver for your solution.  The value for “Total Log Required IOPS” can be ignored as Log IO represents sequential IO which is very easy on the disk subsystem.

With the per server Database Required IOPS value in hand, your job now is to get Jetstress to generate at least that amount of IOPS while delivering passing latency values. This is where some customers get confused due to improper expectations. They may think that Jetstress should always pass no matter what parameters they configure for it. I can tell you that I can make any storage solution fail Jetstress if I crank the thread count high enough, so it actually takes a bit of “under-the-hood” understanding to use Jetstress effectively.

Jetstress generates IO based on a global thread count, with each thread meant to generate 30-60 IOPS. Simply put, if I run a Jetstress test with 2 threads, I would expect it to generate ~120 IOPS on well performing hardware. Therefore, if my Exchange calculator stated I needed to achieve 1,200 IOPS on a server, I would begin by starting a quick 15min test with 20 threads (20 x 60=1,200). If that test generated at least 1,200 IOPS and passed, I would then run a 24hr test with 20 threads to ensure there’s no demons hiding in my hardware that only a long stress test can uncover. If that test passes then I’m technically in the clear and can proceed with the next phase of the Exchange project. Making sure to keep my calculator files, Jetstress configuration XML files, and Jetstress result HTML files in a safe location for potential future reference.

You could spend an hour reading the Jetstress Field Guide but what I’ve just covered is the short version. Get it to pass with the amount of IOPS you need and you’re in the clear. Of course it can often be much more complex than that. You may need to tweak the thread count or update hard drive firmware or correct a controller caching setting (see my post here for the correct settings) to achieve a pass. Auto-tuning actually makes this process a bit simpler, as it tries to determine the maximum amount of threads (which as stated is directly proportional to generated IOPS) the system can handle. However, it can lead to some confusion as people may focus too much on the maximum amount of IOPS a system can deliver instead of focusing on the amount of IOPS you actually need. While it’s certainly a valuable piece of information to know for future planning or even hardware repurposing, you shouldn’t stall your project trying to squeeze every last bit of IOPS out of the system if you’re already easily hitting your IOPS target and passing latency tests.

As someone who works for a hardware vendor, I’ll often get pulled into an escalation where a customer has opened Jetstress, cranked the thread count up to 50, it fails, and they’re pointing the finger at the hardware. However, based on what we already discussed, a thread count of 50 would be 3,000 IOPS. This is fine if the storage purchased with the system can support it. A single 7.2K NL SAS drive can achieve ~55 IOPS for Exchange database workloads, so if a customer has 20 single-disk RAID 0 drives in a system, the math tells us they can’t expect to achieve much more than 1,100 IOPS (20 x 55=1,100). It gets a bit more complicated when using RAID and having to consider which disks are actually in play (EX: In a 10-disk RAID 10, you only get to factor in 5 disks in terms of performance, due to the other 5 being used for mirroring) as well as write penalties when using RAID 5 or RAID 6. The bottom line is that you need a realistic understanding of the amount of IOPS the hardware you purchased can actually achieve, as we all must adhere to the performance laws of rotational media.

Resolution:
Coming back to the issue at hand, now having an understanding of how Jetstress is supposed to work, we see why the results were troubling. Jetstress actually should NOT be generating that many IOPS when using 35 threads. 35 threads should generate ~2,100 IOPS not 25,000 IOPS (35 threads x 60 expected IOPS per thread=2,100). More IOPS is not a good thing because if nothing else, Jetstress is supposed to be predictable in terms of the amount of IO it generates. So why did this system generate so many IOPS and why did it fail? The short answer is that Jetstress doesn’t play well with SSD drives. It will always try to generate more IOPS per thread than expected on SSD storage. As I am not a Jetstress developer I can’t explain why this occurs but after several colleagues have also seen this issue I can at least confirm it happens and provide a workaround. In our customer’s case, they manually specified 1 thread which generated ~2,200 IOPS and passed without any Page Fault Stall errors. This was still way more IOPS than 1 thread should be generating but it achieved their calculator IOPS requirements and allowed them to continue with their project. As for why the test was failing with Page Fault Stalls, even though actual disk latency was fine, I can only speculate. As a Page Fault Stall is an Exchange-related operation (related to querying disk for a database page) and not a pure disk latency operation, I wonder if Jetstress is designed to even generate that many IOPS. I’ve never personally seen it run with more than a few thousand IOPS, so it’s possible the Jetstress application itself couldn’t handle it.

I hope this cleared up some confusion around how to effectively utilize Jetstress. Also, if you happen to come across this specific issue I’d be interested in hearing about it in the comments.

Misconfigured receive connector breaks voicemail delivery


Symptoms

In a Lync and Exchange UM environment (version doesn’t particularly matter in this case), voicemail messages were not being delivered. The voicemail folder on Exchange (C:\Program Files\Microsoft\Exchange Server\V15\UnifiedMessaging\voicemail) was filling up with hundreds of .txt (header files) and .wav (voicemail audio files).

Resolution

This issue is not necessarily new (Reference1 Reference2), but it didn’t immediately come up in search results. I also wanted to spend more time discussing why this issue happened and why it’s important to understand receive connector scoping.

This issue was caused by incorrectly modifying a receive connector on Exchange. Specifically, a custom connector used for application relay was modified so instead of only the individual IP addresses needed for relay (EX: Printers/Copiers/Scanners/3rd Party Applications requiring relay), the entire IP subnet was included in the Remote IP Ranges scoping. This ultimately meant that instead of Lync/ExchangeUM using the default receive connectors (which have the required “Exchange Server Authentication” enabled), they instead were using the custom application relay connector (which did not have Exchange Server Authentication enabled).

This resulted in the voicemail messages sitting in the voicemail folder and errors (Event ID 1423/1446/1335) being thrown in the Application log. The errors will state processing failed for the messages:

The Microsoft Exchange Unified Messaging service on the Mailbox server encountered an error while trying to process the message with header file “C:\Program Files\Microsoft\Exchange Server\V15\UnifiedMessaging\voicemail\<string>.txt”. Error details: “Microsoft.Exchange.UM.UMCore.SmtpSubmissionException: Submission to the Hub Transport server failed. The operation will be retried. —> Microsoft.Exchange.Net.ExSmtpClient.UnexpectedSmtpServerResponseException: Unexpected SMTP server response. Expected: 220, actual: 500, whole response: 500 5.3.3 Unrecognized command

It’s also possible that the voicemail messages will eventually be deleted due to having failed processing too many times (EventID 1335):

The Microsoft Exchange Unified Messaging service on the Mailbox server encountered an error while trying to process the message with header file “C:\Program Files\Microsoft\Exchange Server\V15\UnifiedMessaging\voicemail\<string>.txt”. The message will be deleted and the “MSExchangeUMAvailability: % of Messages Successfully Processed Over the Last Hour” performance counter will be decreased. Error details: “Microsoft.Exchange.UM.UMCore.ReachMaxProcessedTimesException: This message has reached the maximum processed count, “6”.

Unfortunately, once you see this message above (EventID 1335) the message cannot be recovered. When UM states the message will be deleted, it will in fact be deleted with no chance of recovery. If the issue had been going on for several days and this folder were part of your daily backup sets then you could technically restore the files and paste them into the current directory; where they would be processed. However, if you did not have a backup then these voicemails would be permanently lost.

Note: Certain failed voicemail messages can be found in the “C:\Program Files\Microsoft\Exchange Server\V15\UnifiedMessaging\badvoicemail” directory. However, as our failure was a permanent failure related to Transport, they did not get moved to the badvoicemail directory and instead were permanently deleted.

Background

I wanted to further explain how this issue happened, and hopefully clear up confusion around receive connector scoping. In our scenario, someone left a voicemail for an Exchange UM-enabled mailbox which was received and processed by Exchange. The header and audio files for this voicemail message were temporarily stored in the “C:\Program Files\Microsoft\Exchange Server\V15\UnifiedMessaging\voicemail” directory on the Exchange UM server. Our scenario involved Exchange 2013, but the same general logic would apply to Exchange 2007/2010/2016. UM would normally submit these voicemail messages to transport using one of the default Receive Connectors which would have “Exchange Server Authentication” enabled. These messages would then be delivered to the destination mailbox.

Our failure was a result of the UM services being directed to a Receive Connector which did not have the necessary authentication enabled on it (the custom relay connector which only had Anonymous authentication enabled). Under normal circumstances, this issue would probably be detected within a few hours (as users began complaining of not receiving voicemails) but in our case the change was made before the holidays and was not detected until this week (another reason to avoid IT changes before a long holiday). This resulted in the permanent Event 1335 failure noted above and the loss of the voicemail. Since this failure occurs before reaching transport, Safety Net will not be any help.

So let’s turn our focus to Receive Connector scoping, and specifically, defining the RemoteIPRange parameter. Remote IP Ranges define for which incoming IP address/addresses that connector is responsible for handling. Depending on the local listening port, local listening IP address, & RemoteIPRange configuration of each Receive Connector, the Microsoft Exchange Frontend Transport Service and Microsoft Exchange Transport Service will route incoming connections to the correct Receive Connector. The chosen connector then handles the connection accordingly, based on the connector’s configured authentication methods, permission groups, etc. A Receive Connector must have a unique combination of local listening port, local listening IP address, and Remote IP Address (RemoteIPRange) configuration. This means you can have multiple Receive Connectors with the same listening IP address and port (25 for instance) as long as each of their RemoteIPRange configurations are unique. You could also have the same RemoteIPRange configuration on multiple Receive Connectors if your port or listening IP are different; and so on.

The default Receive Connectors all have a default RemoteIPRange of 0.0.0.0-255.255.255.255 (all IPv4 addresses) and ::-ffff:ffff:ffff:ffff:ffff:ffff:ffff:ffff (all IPv6 addresses). The rule for processing RemoteIPRange configurations is that the most accurate configuration is used. Say I have two Receive Connectors in the below configuration:

Name: Default Receive Connector
Local Listening IP and Port (Bindings): 192.168.1.10:25
RemoteIPRange: 0.0.0.0-255.255.255.255


Name: ApplicationRelayConnector
Local Listening IP and Port (Bindings): 192.168.1.10:25
RemoteIPRange: 192.168.1.55

With this configuration, if an inbound connection on port 25 destined for 192.168.1.10 is created from 192.168.1.55, then ApplicationRelayConnector would be used and it’s settings would be applicable. If an inbound connection to 192.168.1.10:25 came from 192.168.1.200 then Default Receive Connector would instead be used.

The below image was taken from the “Troubleshooting Transport” chapter of the Exchange Server Troubleshooting Companion, an eBook co-authored by Paul Cunningham and myself. It’s a great visual aid for understanding which Receive Connector will accept which connection from a given remote IP address. The chapter also contains great tips for troubleshooting connectors, mail flow, and Exchange in general.

1-um

So in my customer’s specific scenario, instead of defining individual IP addresses on their custom application relay receive connector, they instead defined the entire internal IP subnet (192.168.1.0/24). This resulted in not only the internal devices needing to relay hitting the custom application relay connector, but also the Exchange Server itself and the Lync server also hitting the custom application relay connector; thus breaking Exchange Server Authentication. As a best practice, you should always use individual IP addresses when configuring custom application relay connectors, so that you do not inadvertently break other Exchange communications. If this customer had multiple Exchange Servers, this change would have also broken Exchange server-to-server port 25 communications.
Unable to Recreate Exchange Virtual Directory


Issue

A customer of mine recently had an issue where their Exchange 2013 OWA Virtual Directory was missing in IIS. When attempting to recreate the vDir we encountered the below error message:

“An error occurred while creating the IIS virtual directory `IIS://ServerName/W3SVC/1/ROOT/OWA’

1

To resolve this error I needed to resort to using a long lost tool from the days of old, the IIS 6 Resource Kit.

Note: This blog post could also be relevant if the OWA (or any other) vDir needed to be recreated and you encountered the same error upon recreation.

Resolution

Back in the days of Exchange 2003, the IIS Resource Kit, or more specifically the Metabase Explorer, could be used when recreating a Virtual Directory. Fortunately, the Metabase Explorer tool still works with IIS 8.

Download Link for the IIS 6 Resource Kit

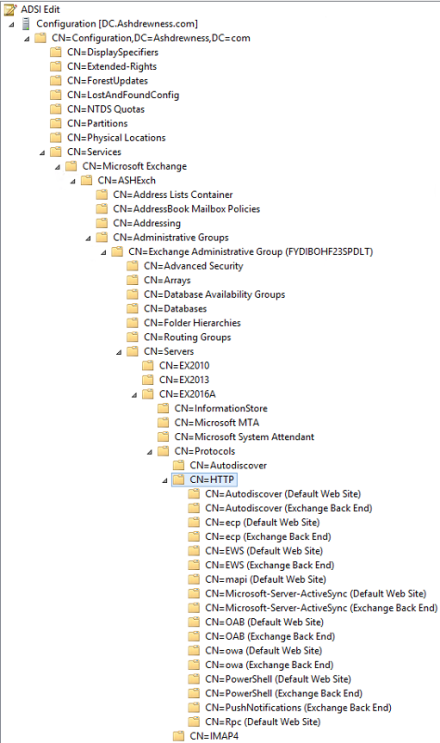
The error encountered above was a result of the IIS Metabase still holding remnants of a past instance of the OWA Virtual Directory, which was preventing the New-OwaVirtualDirectory Cmdlet from successfully completing. It’s important to understand that an Exchange Virtual Directory is really located in two places; Active Directory and IIS. When running the Get-OwaVirtualDirectory Cmdlet (or similar commands for other Virtual Directories), you’re really querying Active Directory. For example, the OWA Virtual Directories for both the Default Web Site and Exchange Back End website in my lab are located in the following location in AD (via ADSIEDIT):

2

So if a vDir is missing in IIS but present in AD, you’ll likely need to first remove it using the Remove-*VirtualDirectory Cmdlet otherwise it will generate an error stating it already exists. In my customer’s scenario, I had to do this beforehand as the OWA vDir was present in AD but missing in IIS.

This brought us to the state we were in at the beginning of this post; receiving the above error message. The OWA vDir was no longer present in AD nor in the Default Web Site, but when trying to recreate it using New-OwaVirtualDirectory we received the above error message.

Tip: Use Get-*VirtualDirectory with the –ShowMailboxVirtualDirectories parameter to view the Virtual Directories on both web sites. For example:

3

The solution was to install the IIS 6 Resource Kit and use Metabase Explorer to delete the ghosted vDir. When installing the Resource Kit, select Custom Install and then uncheck all features except for Metabase Explorer 1.6 and proceed with the installation. Once it finishes, it may require you add the .NET Framework 3.5 Feature.

When you open the tool on the Exchange Server in question, navigate to the below tree structure and delete the old OWA Virtual Directory by right-clicking it and selecting Delete. When completed, the OWA vDir should no longer be present (as seen below).

4

You should now be able to successfully execute the New-OwaVirtualDirectory Cmdlet. It’s always a bit nostalgic seeing a tool of days gone by still able to save the day. I’d like to thank my co-worker John Dixon for help with this post. When I can’t figure something out in Exchange/IIS (or anything really) he’s who I lean on for help.

NIC DNS Registration and Exchange Servers


Symptom

I recently worked with a customer who had introduced an Exchange 2013 Server into an existing Exchange 2007 environment. The issue was the 2013 Server was unable to send email anywhere; neither externally or to other Exchange Servers. If you executed the below command to view the status of the transport queues you received the below output:

Get-Queue <Queue Identity> | FL

NIC

Specifically, the error message you would receive is “4.4.0 DNS query failed. The error was: DNS query failed with error ErrorRetry”

This is a fairly common error indicating there is an issue contacting the DNS Server or Servers that Exchange is configured to use. ReferenceA ReferenceB

Resolution

However, in this case the issue was not obvious, unless you had already seen this issue before or knew a little bit about the health checks Exchange uses to ensure it’s healthy.

I remembered seeing a similar issue on a Reddit thread awhile back, which caused me to search and find this Microsoft KB article titled “DNS query failed” error when an email message is stuck in the Draft folder in an Exchange Server 2013 environment”.

This was the resolution in my scenario as well. To resolve the issue, I simply had to re-check the “Register this connection’s addresses in DNS” option on the IPv4> Properties>Advanced>DNS tab on the primary NIC used for Active Directory communications. While you can uncheck this box on secondary NICs (such as for iSCSI, Replication, Backup, etc.), it should always remain checked on the MAPI/Primary NIC. I’ve also seen issues where having this unchecked on a 2013/2016 DAG node will result in Managed Availability-triggered database failovers.

Quick method to determine installed version of .NET Framework


Edit: This excellent post by MVP Michel de Rooij details the proper steps for upgrading .NET version and Exchange Cumulative Updates in the proper order

Due to recent issues with unsupported versions of .NET being installed on Exchange servers, as well as the fact that Exchange Server requires specific versions of .NET to be installed (Exchange Server 2013 System Requirements & Exchange Server 2016 System Requirements), there is a need to quickly query the installed version of .NET on Exchange servers. I have also been involved in several Exchange support escalations where updating the Exchange servers from .NET 4.5.1 to 4.5.2 resolved CPU performance issues.

Fortunately, my coworker and fellow Exchange MCM Mark Henderson wrote this quick and easy way to query the currently installed version of .NET.

PowerShell Query Method

To query the local Registry using PowerShell, execute the below command in an elevated PowerShell session.

(Get-ItemProperty ‘HKLM:\SOFTWARE\Microsoft\NET Framework Setup\NDP\v4\Full’  -Name Release).Release

You can then use the table below to reference the installed version of .NET. For instance, if the returned value is 379893, then .NET 4.5.2 is installed.


Version Value of the Release DWORD
.NET Framework 4.5


378389
.NET Framework 4.5.1 installed with Windows 8.1


378675
.NET Framework 4.5.1 installed on Windows 8, Windows 7 SP1, or Windows Vista SP2


378758
.NET Framework 4.5.2


379893
.NET Framework 4.6 installed with Windows 10


393295
.NET Framework 4.6 installed on all other Windows OS versions


393297
.NET Framework 4.6.1 installed on Windows 10


394254
.NET Framework 4.6.1 installed on all other Windows OS versions


394271
NET Framework 4.6.1 installed on all other Windows OS versions (With required Hotfix)


394294
.NET Framework 4.6.2 installed on Windows 10 Anniversary Update


394802
.NET Framework 4.6.2 installed on all other Windows OS versions


394806
.NET Framework 4.7.0 installed on Windows 10 Creators Update


460798
.NET Framework 4.7.0 installed on all other Windows OS versions


460805
.NET Framework 4.7.1 installed on Windows 10 Fall Creators Update


461308
.NET Framework 4.7.1 installed on all other Windows OS versions


461310

Copy the below text into a text file and rename the extension to .ps1. You can then execute this script and have it automatically tell you the installed version of .NET.Script method

# Determine the version of .net 4 framework by querying Registry HKLM:\SOFTWARE\Microsoft\NET Framework Setup\NDP\v4\Full for Value of Release
#
# Based on https://msdn.microsoft.com/en-us/library/hh925568(v=vs.110).aspx
#
#
#

$Netver = (Get-ItemProperty ‘HKLM:\SOFTWARE\Microsoft\NET Framework Setup\NDP\v4\Full’ -Name Release).Release

If ($Netver -lt 378389)
{
Write-Host “.NET Framework version OLDER than 4.5” -foregroundcolor yellow
}
ElseIf ($Netver -eq 378389)
{
Write-Host “.NET Framework 4.5” -foregroundcolor red
}
ElseIf ($Netver -le 378675)
{
Write-Host “.NET Framework 4.5.1 installed with Windows 8.1” -foregroundcolor red
}
ElseIf ($Netver -le 378758)
{
Write-Host “.NET Framework 4.5.1 installed on Windows 8, Windows 7 SP1, or Windows Vista SP2” -foregroundcolor red
}
ElseIf ($Netver -le 379893)
{
Write-Host “.NET Framework 4.5.2” -foregroundcolor red
}
ElseIf ($Netver -le 393295)
{
Write-Host “.NET Framework 4.6 installed with Windows 10” -foregroundcolor red
}
ElseIf ($Netver -le 393297)
{
Write-Host “.NET Framework 4.6 installed on all other Windows OS versions” -foregroundcolor red
}
ElseIf ($Netver -le 394254)
{
Write-Host “.NET Framework 4.6.1 installed on Windows 10” -foregroundcolor red
}
ElseIf ($Netver -le 394271)
{
Write-Host “.NET Framework 4.6.1 installed on all other Windows OS versions” -foregroundcolor red
}
ElseIf ($Netver -le 394294)
{
Write-Host “.NET Framework 4.6.1 installed on all other Windows OS versions (With required Hotfix)” -foregroundcolor red
}
ElseIf ($Netver -le 394802)
{
Write-Host “.NET Framework 4.6.2 installed on Windows 10 Anniversary Update” -foregroundcolor red
}
ElseIf ($Netver -le 394806)
{
Write-Host “.NET Framework 4.6.2 installed on all other Windows OS versions” -foregroundcolor red
}
ElseIf ($Netver -le 460798)
{
Write-Host “.NET Framework 4.7.0 installed on Windows 10 Creators Update” -foregroundcolor red
}
ElseIf ($Netver -le 460805)
{
Write-Host “.NET Framework 4.7.0 installed on all other Windows OS versions” -foregroundcolor red
}
ElseIf ($Netver -le 461308)
{
Write-Host “.NET Framework 4.7.1 installed on Windows 10 Fall Creators Update” -foregroundcolor red
}
ElseIf ($Netver -le 461310)
{
Write-Host “.NET Framework 4.7.1 installed on all other Windows OS versions” -foregroundcolor red
}


References:

How to: Determine Which .NET Framework Versions Are Installed


Mailbox Anchoring affecting new deployments & upgrades


Update2 (March 1st 2016): Microsoft has released the following blog post which states this behavior will be reverted/absent in 2013 CU12 and RTM/CU1 versionf of Exchange 2016 Remote PowerShell Proxying Behavior in Exchange 2013 CU12 and Exchange 2016

Update: Microsoft has released the following KB article to address this issue: “Cannot process argument transformation” error for cmdlets in Exchange Server 2013 with CU11

Note: This article should also apply when Exchange 2016 CU1 releases and includes Mailbox Anchoring (unless Microsoft makes a change to behavior before it’s release). So the scenario of installing the first Exchange 2016 server using CU1 bits into an existing environment would also apply.

Summary

It was announced in Microsoft’s recent blog post about Exchange Management Shell and Mailbox Anchoring that the way Exchange is managed will change going forward. Starting with Exchange 2013 CU11 (released 12/10/2015) and Exchange 2016 CU1 (soon to be released), an Exchange Management Shell session will be directed to the Exchange Server where the user who is attempting the connection’s mailbox is located. If the connecting user does not have a mailbox, an arbitration mailbox (specifically SystemMailbox{bb558c35-97f1-4cb9-8ff7-d53741dc928c) will be used instead. In either case, if the mailbox is unavailable (because it’s on a database that’s dismounted or is on a legacy version of Exchange) then Exchange Management Shell will be inoperable.

Issue

While it has always been recommended to move system and Arbitration mailboxes to the newest version of Exchange as soon as possible, there is a scenario involving Exchange 2013 CU11 which have led to customer issues:

  • Existing Exchange 2010 Environment
  • The first version of Exchange 2013 installed into the environment is CU11
  • Upon installation, the Exchange Admin is unable to use Exchange Management Shell on Exchange 2013. Thus preventing the management of Exchange 2013 objects
  • The Exchange Admin may also be unable to access the Exchange Admin Center using traditional means

This is due to the new Mailbox Anchoring changes. If the Exchange Admin’s mailbox (or the Arbitration mailbox, if the Exchange Admin did not have a mailbox) was on Exchange 2013 then this issue would not exist. However, because this was the first Exchange 2013 server installed into the environment, and it was CU11, there was no way to prevent this behavior.

This issue was first reported by Exchange MVP Ed Crowley, and yesterday a customer of mine also encountered the issue. The symptoms were mostly the same but the ultimate resolution was fairly straightforward.

Possible Resolutions

Resolution#1:

Attempt to connect to Exchange Admin Center on 2013 using the “Ecp/?ExchClientVer=15” string at the end of the URL (Reference). For Example:

I’ve heard mixed results using this method. When Ed Crowley encountered this issue, this URL worked, yet when I worked with my customer I was still unable to access EAC by using this method. However, it is worth an attempt. Once you’re connected to EAC, you can use it to move your Exchange Admin mailbox to 2013. However, should you not have a mailbox for your Exchange Admin account, this method may fail because there’s currently no way to move Arbitration Mailboxes via the EAC. So it’s recommended to create a mailbox for your Exchange Admin account using the EAC and then you’ll be able to connect via EMS.

Resolution#2:

Note: Using this method has a low probability of success as Microsoft recommends using the newer version of Exchange to “pull” a mailbox from the older version. Based on feedback I’ve received from Microsoft Support, you may consider just skipping this step and going to Step 3.

Use Exchange 2010 to attempt to move the Exchange Admin mailbox to a database on Exchange 2013. Historically, it’s been recommended to always use the newest version of Exchange to perform a mailbox move. In my experience this is hit or miss depending on the version you’re moving from and the version you’re moving to. However, it’s worth attempting:

Issue the below command using Exchange 2010 Management Shell to move the Exchange Admin’s mailbox to the Exchange 2013 server:

New-MoveRequest <AdminMailbox> -TargetDatabase <2013Database>

If the Exchange Administrator does not have a mailbox, then move the Arbitration mailboxes to Exchange 2013:

Get-Mailbox –Arbitration | New-MoveRequest -TargetDatabase <2013Database>

Resolution#3:

Connect to Exchange 2013 CU11 using Local PowerShell and manually load the Exchange modules:

  • On the Exchange 2013 CU11 Server, open a Windows PowerShell window as Administrator
  • Run the following command:
    • Add-PSSnapin Microsoft.Exchange.Management.PowerShell.SnapIn

At this point the local PowerShell module can be used to move the Exchange Admin’s mailbox to the Exchange 2013 server:

New-MoveRequest <AdminMailbox> -TargetDatabase <2013Database>

If the Exchange Administrator does not have a mailbox, then move the Arbitration mailboxes to Exchange 2013:

Get-Mailbox –Arbitration | New-MoveRequest -TargetDatabase <2013Database>

In addition, there have been reported issues with 2013 EMS still having connectivity issues even after the relevant mailboxes have been moved. A different Windows user with appropriate Exchange permissions (using a different Windows profile) will work fine however. It seems there are PowerShell cookies for the initial profile used which could still be causing problems. In this scenario, you may have to remove all listed cookies in the following registry key (Warning, edit the registry at your own risk. A backup of the registry is recommended before making modifications):

HKEY_CURRENT_USER\Software\Microsoft\Windows\CurrentVersion\WSMAN\Client\ConnectionCookies

Summary

It should be noted that while this scenario involved Exchange 2013 CU11 being installed into an existing Exchange 2010 environment, it can affect other scenarios as well:

  • Exchange 2013 CU11 or newer being installed into an existing Exchange 2010 environment
  • Exchange 2013 CU11 or newer being installed into an existing Exchange 2007 environment
  • Exchange 2016 CU1 (when released) or newer being installed into an existing Exchange 2010 environment

So unless Microsoft changes the behavior of Mailbox Anchoring, this is a precaution that should be taken when installing the first Exchange 2013 CU11/2016 CU1 (when released) server into an existing environment.


Edit: This forum post also describes the issue. In it, the user experiences odd behavior with the 2013 servers not being displayed if you run a Get-ExchangeServer & other odd behavior. This is similar to what I experienced in some lab testing. Ultimately, the same resolution applies.

https://social.technet.microsoft.com/Forums/en-US/05897b40-0717-437d-90ca-d550e3226c2a/exchange-2013-cu-11-breaks-some-admin-accounts-?forum=exchangesvrdeploy