Disabling Outlook Anywhere & Avoiding Unnecessary Authentication Prompts for Certain Mailboxes


So this is a complicated scenario but only because this particular customer made it that way; in fact the solution ended up being very simple.

Scenario:

One of my Consultant co-workers pinged me on an issue he was sorting through at a customer site. They were using UAG for their Outlook Anywhere endpoint, both internally & externally. They had a policy to only allow Outlook Anywhere for roughly 30% of their user base. They were enforcing this using AD group membership in UAG to block access to the Outlook Anywhere rule for all users except for those on the allowed list.

Not only was this a nightmare to manage but it also caused Outlook Authentication prompts in certain scenarios. I’ll explain:

When internal Outlook users moved between wired & wireless networks (or vice versa), Outlook would be disconnected just long enough for it to attempt an Outlook Anywhere connection over HTTPS (since the RPC/MAPI connection didn’t reconnect quite fast enough for Outlook’s liking). Well since they were using NTLM for Outlook Anywhere this didn’t really pose a problem for the users who had been allowed to use the OA rule in UAG. However, the users who had been blocked (the majority of their users) would get Outlook auth prompts.

This raised another question from the Consultant & the client; why does enabling Outlook Anywhere on your Client Access Server result in all Outlook clients being enabled for Outlook Anywhere? Shouldn’t there be a method to disable it by default & only enable it via AutoDiscover in Outlook on the mailboxes we choose? Well I’m not Microsoft so I couldn’t answer that but what I was able to do was give them a much better solution going forward which wouldn’t require the hassle of managing group membership for the UAG rule.

Background:

When you enable Outlook Anywhere on your Client Access Server (Exchange 2007/2010), AutoDiscover will then start handing out information to all Outlook Clients on how to connect via OA if a direct RPC/MAPI/TCPIP isn’t available. This allows external Outlook clients to connect to their Mailbox without the use of a VPN.

Exchange AutoDiscover hands these out using what’s called Outlook Providers. These allow Administrators & Exchange itself to differentiate between the various settings used with Outlook Anywhere VS direct RPC/MAPI/TCPIP connections.

The EXCH Outlook Provider is used to hand out settings used when connecting via RPC/MAPI/TCPIP while the EXPR Outlook Provider is used to hand out settings when connecting via Outlook anywhere (RPC over HTTPS). You can view the settings of each by running Get-OutlookProvider | Format-List.

This is the response received using the Test E-mail AutoConfiguration utility in Outlook for a mailbox after Outlook Anywhere has been enabled in the environment. This image shows the EXCH settings.
1

This image shows the EXPR settings received in the same AutoDiscover response. These are the settings Outlook will use to connect to Outlook Anywhere if it needs to. Notice here it says “Exchange HTTP” for the Protocol opposed to “Exchange RPC” in the previous image.
2

Below you’ll find the XML response from the “XML” tab of the Test E-mail AutoConfiguration utility. You can see the settings for both the EXCH & EXPR Outlook Providers.

<Protocol>

        <Type>EXCH</Type>

        <Server>CASArrayAustin.contoso.local</Server>

        <ServerDN>/o=Contoso/ou=Exchange Administrative Group (FYDIBOHF23SPDLT)/cn=Configuration/cn=Servers/cn=CASArrayAustin.contoso.local</ServerDN>

        <ServerVersion>7383807B</ServerVersion>

        <MdbDN>/o=Contoso/ou=Exchange Administrative Group (FYDIBOHF23SPDLT)/cn=Configuration/cn=Servers/cn=CASArrayAustin.contoso.local/cn=Microsoft Private MDB</MdbDN>

        <PublicFolderServer>EX10A.contoso.local</PublicFolderServer>

        <AD>ausdc.contoso.local</AD>

        <ASUrl>https://mail.ash.org/ews/exchange.asmx</ASUrl&gt;

        <EwsUrl>https://mail.ash.org/ews/exchange.asmx</EwsUrl&gt;

        <EcpUrl>https://mail.ash.org/ecp/</EcpUrl&gt;

        <EcpUrl-um>?p=customize/voicemail.aspx&amp;exsvurl=1</EcpUrl-um>

        <EcpUrl-aggr>?p=personalsettings/EmailSubscriptions.slab&amp;exsvurl=1</EcpUrl-aggr>

        <EcpUrl-mt>PersonalSettings/DeliveryReport.aspx?exsvurl=1&amp;IsOWA=&lt;IsOWA&gt;&amp;MsgID=&lt;MsgID&gt;&amp;Mbx=&lt;Mbx&gt;</EcpUrl-mt>

        <EcpUrl-ret>?p=organize/retentionpolicytags.slab&amp;exsvurl=1</EcpUrl-ret>

        <EcpUrl-sms>?p=sms/textmessaging.slab&amp;exsvurl=1</EcpUrl-sms>

        <OOFUrl>https://mail.ash.org/ews/exchange.asmx</OOFUrl&gt;

        <UMUrl>https://mail.ash.org/ews/UM2007Legacy.asmx</UMUrl&gt;

        <OABUrl>https://mail.ash.org/oab/69ed661e-c685-4ae2-a284-da308d7bd480/</OABUrl&gt;

      </Protocol>

<Protocol>

        <Type>EXPR</Type>

        <Server>oa.ash.org</Server>

        <SSL>On</SSL>

        <AuthPackage>Basic</AuthPackage>

        <ASUrl>https://mail.ash.org/ews/exchange.asmx</ASUrl&gt;

        <EwsUrl>https://mail.ash.org/ews/exchange.asmx</EwsUrl&gt;

        <EcpUrl>https://mail.ash.org/ecp/</EcpUrl&gt;

        <EcpUrl-um>?p=customize/voicemail.aspx&amp;exsvurl=1</EcpUrl-um>

        <EcpUrl-aggr>?p=personalsettings/EmailSubscriptions.slab&amp;exsvurl=1</EcpUrl-aggr>

        <EcpUrl-mt>PersonalSettings/DeliveryReport.aspx?exsvurl=1&amp;IsOWA=&lt;IsOWA&gt;&amp;MsgID=&lt;MsgID&gt;&amp;Mbx=&lt;Mbx&gt;</EcpUrl-mt>

        <EcpUrl-ret>?p=organize/retentionpolicytags.slab&amp;exsvurl=1</EcpUrl-ret>

        <EcpUrl-sms>?p=sms/textmessaging.slab&amp;exsvurl=1</EcpUrl-sms>

        <OOFUrl>https://mail.ash.org/ews/exchange.asmx</OOFUrl&gt;

        <UMUrl>https://mail.ash.org/ews/UM2007Legacy.asmx</UMUrl&gt;

        <OABUrl>https://mail.ash.org/oab/69ed661e-c685-4ae2-a284-da308d7bd480/</OABUrl&gt;

      </Protocol>

      <Protocol>

This image shows the actual Outlook Anywhere settings being configured on the client as a result of the AutoDiscover EXPR response. (File>Account Settings>Change>More Settings>Connection)
3

Resolution:

So the solutions here is actually fairly easy & oddly enough, not well known. The Set-CASMailbox command can be used to block a particular mailbox from accessing various Client Access features. In this case we can use it to block Outlook Anywhere for John’s Mailbox. (Note: This command can also be scripted or piped to take effect on any number of mailboxes in the environment).

Set-CASMailbox –Identity John –MAPIBlockOutlookRpcHttp $True

After running this command you may need to wait about 15min for AD replication to take effect as well as 15min for AutoDiscover, Outlook Anywhere, & ultimately Outlook to take the change. To speed this process up you can recycle the MSExchangeAutodiscoverAppPool in IIS as well as restart the Microsoft Exchange Service Host service on each CAS.

Now, if you run Test E-mail AutoConfiguraton you’ll see that the Outlook client doesn’t even get the EXPR response because they’ve had that feature blocked.

4

Now if you look at the Outlook Anywhere settings (below) in Outlook, they are no longer even configured/enabled. Now in my lab using Outlook 2013 I had to actually perform a profile repair to get this change to take effect immediately. You will likely either have to wait longer for it to take effect or manually repair the profile.

5

So in this customer’s case, users who were not allowed to use Outlook Anywhere would not get the Outlook Authentication prompt when moving from internal wired to wireless or vice versa because their Outlook client never attempted the Outlook Anywhere connection; they just remained in a disconnected state until the new connection came fully online.

Also, after showing the customer this command they no longer had to rely on UAG to control who could or couldn’t access Outlook Anywhere; they could now just script the Set-CASMailbox command.

Publish all exchange roles on one TMG listener


I have had a few requests for publishing everything on one listener, so here is it (this is an addendum to the rest of the articles not a re-write)

OA\EWS and OAB should be able to use the form based listener because it is supposed to change to basic, this is based on information provided by outlook when connecting. (it doesn’t always work but here is how to make it)

To make this work every time here are the steps:

  1. Publish OWA using the following article.
    https://exchangemaster.wordpress.com/2010/04/09/publish-exchange-2010-with-tmg-forefront-threat-management-gateway/
  2. Publish OA\EWS\OAB using the this article

NOTE: This Method moves the authentication from the TMG to the Exchange server eliminating Pre-authentication for Outlook Anywhere.
This will also work for publishing ADFS 2.0 for Office 365 using a single listener (Coming Soon)

Configure Outlook anywhere rule on TMG

  1. Open Forefront TMG
  2. Click on image_thumb5[1]
  3. In the Action Pane under Task click image_thumb6[1]
  4. Give the rule a Name ill name mine “2010 OA”
  5. image
  6. Next –> Next
  7. image_thumb8[1]
  8. Internal Site Name should be your CAS server FQDN (needs to be on the cert)
  9. image_thumb9[1]
  10. The external name is what you use to access OA (Also needs to be on the cert)
  11. image
  12. Click –> Next –> Finish –> Select the Listener. (Choose the OWA listener you created before)

  13. This step moves the auth from the TMG server and moves it to the Exchange
  14. image
  15. Modify the User set to include “all users” and remove “all authenticated users”.
  16. clip_image002
  17. You may get the following error you can click ok and ignore it. (Do not check require users to authenticate check box on the listener or this method will not work)
  18. clip_image002[5]
  19. Finish
  20. Now Outlook anywhere is published using the same listener as OWA! (Albeit without pre-auth)

TMG NLB and F5 Publishing Problems


Environment:

TMG array –> F5 Load Balancer –> Published service

Problem:

When traffic comes in through TMG to F5, F5 doesn’t respond correctly to the load balanced request and then TMG doesn’t see any response.

Reason:

  1. F5 extracts the MAC address from the Ethernet header instead of arp requests
  2. MS NLB uses MAC address spoofing to prevent switch port flooding in unicast NLB. NLB will mask the MAC address of a host with the NLB cluster host number and assign to each node in the cluster.
  3. Since F5 doesn’t use arp requests, the NLB driver isn’t used to properly assign the correct MAC address to the sending host via the arp request.

Solution:

  1. Set MaskSourceMAC registry value to 0 on the adapters on both TMG servers that are in the NLB array sending to F5. http://support.microsoft.com/?id=193602
  2. Put a Hub between the F5 and the TMG array to prevent switch port flooding.

Walkthrough Series: Threat Management Gateway \ Exchange publishing


Since it seems to be a popular series I wanted to consolidate links to all my TMG Publishing articles.

As you may know they are designed to be a very simple walkthrough to get you started, the in no way cover every scenario but it should be enough to get you started.Then once you have it working, backup the config and tweak to your hearts content :), Have fun securing exchange.

  1. OWA
  2. EWS\Outlook anywhere
    Alternate method without pre-auth: using the same listener as OWA
  3. Active sync
  4. SMTP 
  5. Front-End \ Back-end TMG 
  6. Ehlo article and Detailed white Paper From Greg Taylor.

Publishing Exchange through TMG Back-end\Front-end configuration


Can you believe it I finally got this done! This process can be used for Exchange 2007 or 2010.
This is a basic walkthrough on getting OWA published through a TMG Front-end\Back-end scenario.

Well lets get started!
First we have to establish the basic configuration

The lab will be configured as shown

image

First Obviously we need physical connectivity as defined.

  • 2 TMG servers with 2 NICs each
  • Each with a NIC on the DMZ network.
  • The Frontend connected to the ISP
  • The Backend connected to the LAN

Backend server

  1. Configure NICs
    1. DMZ NIC =  IP: 192.168.1.2/24, Gateway: 192.168.1.1, , DNS: Null
    2. Inter NIC = IP: 192.168.2.1/24 Gateway: Null, DNS: 192.168.2.10 (Internal Domain DNS)
  2. Join to domain
  3. Install TMG
  4. Configuration
    1. Getting Started Wizard
      image
    2. Configure Network Settings
      1. Next
        image
      2. Next
        image
      3. Important: Choose Private at the Bottom so the BE can route.
      4. image
      5. Finish
    3. Configure System Settings
      1. I make sure mine is connected to the domain (just makes permissions easier)
        image[65]
    4. Define Deployment options
      1. This is a preference but for this Lab I disable all updates or NIS updates
    5. Remote Access Wizard (again preference But I limit config as this is a publishing lab not client access)
      1. image
      2. image
      3. image
      4. image
      5. This one can make troubleshooting difficult if configured any other way
        image
      6. image
      7. image
    6. Network Rule Creation
      1. Edit the Internal to Perimeter Rule
        image
      2. image
      3. image
    7. Firewall Rule Creation
      1. image
      2. image
      3. image
      4. image
        image
        image
      5. image
      6. image
      7. imageimage
      8. imageimage
      9. image
      10. image
      11. image
      12. image

Front-end server

  1. Configure NICs
    1. DMZ NIC =  IP: 192.168.1.1/24, Gateway: 192.168.1.1, , DNS: 192.168.2.10 (Internal Domain DNS)
    2. Inter NIC = IP: ISP assigned Gateway: ISP assigned, DNS: null
  2. Install TMG
  3. Configuration
    1. Getting Started Wizard
      image
    2. Configure Network Settings
      1. Next
      2. image
      3. Be sure to add the additional route for the LAN network behind the back-end server.
        This also adds the internal LAN network to the Internal Network object(networking\networks), and adds a static route for the Internal network as well (Networking\routing tab) 
        imageimage
      4. In my case I have a dynamic IP in my lab, but this would be your ISP provided IP
        image
      5. image
      6. At this point you should have routing connectivity to the domain.
    3. Configure System Settings
      1. I make sure mine is connected to the domain (just makes permissions easier)
        image
        You can join the domain here
    4. Define Deployment options
      1. This is a preference but for this Lab I disable all updates or NIS updates
    5. Remote Access Wizard (again preference But I limit config as this is a publishing lab not client access)
      1. image
      2. image
      3. image
      4. image
      5. This one can make troubleshooting difficult if configured any other way
        image
      6. image
      7. image
    6. Publishing Rules (Same as previous Posts, sample here see other posts for more details)
      1. image
      2. This is a basic auth listener that will work for OWA\EAS\OLA but doesn’t include forms
      3. image
      4. image
      5. image
      6. image
      7. Make sure this Name is accessible from the FE server (the name also needs to be on the trusted certificate on the exchange server)
        image
      8. image
      9. image
      10. image
      11. image
      12. image
      13. image
      14. image
      15. image
      16. image
      17. This may change based on your scenario
        image
      18. image
      19. Finish
    7. Apply Changes and Test!!!


Note: I also like to create a test Rule that I leave disabled unless I need to determine if I have a Firewall rule issue or Network issue.
image

Here is another reference for the same process in a slightly different scenario
http://araihan.wordpress.com/2010/06/17/how-to-configure-back-to-back-firewall-with-perimeter-dmz-topology-step-by-step-guide/

You Had Me At EHLO… : Publishing Exchange Server 2010 with Forefront UAG and TMG


Inbox_blogSome of you have been able to use my basic quick and dirty walkthrough for publishing Exchange2010 with TMG.

Good news! there is a very detailed whitepaper from Greg Taylor that goes in to much more detail.

Here is a link to the whitepaper as well as the EHLO article.

That being said I am still working on the:
Internet –> TMG FE –> TMG BE –> Exchange Publishing rules and hopefully will have the walkthrough done by the 23rd.

You Had Me At EHLO… : Publishing Exchange Server 2010 with Forefront UAG and TMG

Publish Exchange 2010 with TMG (cont)


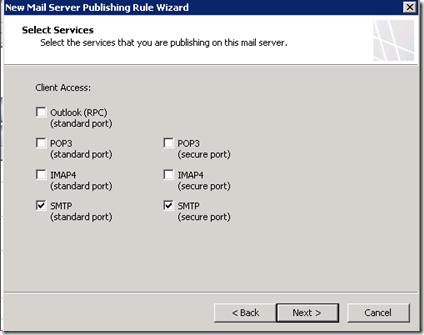
Walkthrough on publishing all roles through TMG. (Part 4/4 SMTP)

This assumes:

  1. you have a MX record pointed to a name that points to the external IP of your TMG
  2. You have already configure your exchange to allow anonymous access on the receive connector

Configure SMTP rule on TMG

  1. Open Forefront TMG
  2. Click on  image_thumb51_thumb1[1]
  3. In the Action Pane under Task click image
  4. image
  5. image
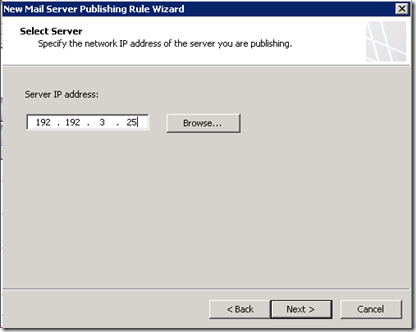
  6. Enter your Transport Server internal IP
  7. image
  8. image
  9. image
  10. You should now be able to send mail through your TMG to your Exchange.

Publish Exchange 2010 with TMG (Forefront Threat Management Gateway) Series:

1. OWA
2. EWS\Outlook anywhere
3. Active sync
4. SMTP

Publish Exchange 2010 with TMG (cont)


Walkthrough on publishing all roles through TMG with AD pre-auth on TMG. (Part 3/4 active sync)

Configure Active sync rule on TMG

  1. Open Forefront TMG
  2. Click on image_thumb5[1]
  3. In the Action Pane under Task click  image_thumb6[2]
  4. Give the rule a Name ill name mine “2010 Activesync”
  5. image
  6. Next –> Next
  7. image
  8. Internal Site Name should be your CAS server FQDN (needs to be on the cert)
  9. image
  10. The external name is what you use to access active sync(Also needs to be on the cert)
  11. image
  12. Select the Listener OA listener created on Part 2.
  13. image_thumb24[1]
  14. image
  15. image
  16. Finish
  17. Now Outlook anywhere is published!
  • Go Back To OWA
  • Go Back to Outlook anywhere

  • Move on to SMTP

    Publish Exchange 2010 with TMG (Forefront Threat Management Gateway) Series:

    1. OWA
    2. EWS\Outlook anywhere
    3. Active sync
    4. SMTP

  • Publish Exchange 2010 with TMG (cont)


    Walkthrough on publishing all roles through TMG with AD pre-auth on TMG. (Part 2/4 EWS\Outlook anywhere)

    Configure Outlook anywhere rule on TMG

    1. Open Forefront TMG
    2. Click on image_thumb5[1]
    3. In the Action Pane under Task click  image_thumb6[1]
    4. Give the rule a Name ill name mine “2010 OA”
    5. image
    6. Next –> Next
    7. image_thumb8[1]
    8. Internal Site Name should be your CAS server FQDN (needs to be on the cert)
    9.  image_thumb9[1]
    10. The external name is what you use to access OA (Also needs to be on the cert)
    11. image
    12. Click new to make a new Listener
    13. image_thumb11[1]
    14. Name it whatever you want, I named mine “Basic Auth” because I am going to use it for Basic auth for OA\EWS.
    15. image_thumb12[1]
    16. Select one of the External IPs listed (not all IP addresses or you cant do multiple auth methods)
    17. image
    18. Select the certificate you imported earlier
    19. image_thumb14[1]
    20. Use HTTP Authentication
    21. image 
    22. Click –> Next –> Finish –> Select the Listener.
    23. image
    24. image 
    25. image_thumb19[1]
    26. Finish
    27. Now Outlook anywhere is published!

    Publish Exchange 2010 with TMG (Forefront Threat Management Gateway) Series:

    1. OWA
    2. EWS\Outlook anywhere
    3. Active sync
    4. SMTP

    Publish Exchange 2010 with TMG (Forefront Threat Management Gateway)


    Walkthrough on publishing all roles through TMG with AD pre-auth on TMG. (Part 1/4 OWA)

    Keep in mind to do it this way you need to have the following

    1. At least 2 External IPs listed on the external NIC (in order to have both forms based auth for OWA\ECP and Basic for OA,EWS,EAS
    2. A multi-name trusted Certificate with all applicable names (For more information) –This is critical!
    3. TGM can authenticate with AD already (either domain joined or authentication configured)

    Start By preparing the exchange server

    1. Configure Exchange 2010 for basic authentication
      1. Run the following on the CAS server that will be published
        • Set-OwaVirtualDirectory -id <CasServer>\* -BasicAuthentication $true -WindowsAuthentication $true -FormsAuthentication $false
        • set-WebServicesVirtualDirectory -id <CasServer>\* -WindowsAuthentication $true -BasicAuthentication $true
        • set-EcpVirtualdirectory -id <CasServer>\* -BasicAuthentication $true -WindowsAuthentication $true -FormsAuthentication $false
        • set-OabVirtualDirectory -id <CasServer>\* -WindowsAuthentication $true -BasicAuthentication $true
        • set-ActiveSyncVirtualDirectory -id <CasServer>\* -BasicAuthentication $true
    2. Copy the 3rd party certificate to the TMG server.
      1. Click Start –> Run –> Type MMC
      2. Click File –> add remove Snap-in –> Certificates –> ADD –> Computer account-> Next –> finish-> ok
      3. Click Personal –> certificates
      4. Right Click on 3rd party certificate and click all tasks –> export
      5. Click Next –> Yes, Export Private Key –> Base-64 –> next –> Browse for file location.
      6. Next-> finish
      7. Copy certificate file to the TMG server
      8. Click Start –> Run –> Type MMC
      9. Click File –> add remove Snap-in –> Certificates –> ADD –> Computer account-> Next –> finish-> ok
      10. Click Personal –> Right Click certificates –> all task –> import –> next –> select file –> next –> next finish
    3. Configure OWA Rule on TMG
      1. Open Forefront TMG
      2. Click on image
      3. In the Action Pane under Task click  image
      4. Give the rule a Name ill name mine “2010 OWA”
      5. image
      6. Next –> Next
      7. image
      8. Internal Site Name should be your CAS server FQDN (needs to be on the cert)
      9. image
      10. The external name is what you use to access OWA (Also needs to be on the cert)
      11. image
      12. Click new to make a new Listener
      13. image
      14. Name it whatever you want, I named Mine FBA because I am going to use it for Forms Based auth for OWA.
      15. image
      16. Select one of the External IPs listed (not all IP addresses or you cant do multiple auth methods)
      17. image
      18. Select the certificate you imported earlier
      19. image
      20. Use Form Authentication
      21. image
      22. You can configure SSO if you have other sites that will use this listener
      23. image
      24. Click –> Next –> Finish –> Select the Listener.
      25. image
      26. image
      27. image 
        You CANNOT use “all users” here you need to have authenticated users or another group that requires authentication or your will not get prompted for auth. and get a 500.24 in browser
      28. Finish
      29. Now OWA is published!
    4. Now on to EWS\Outlook Anywhere


    Publish Exchange 2010 with TMG (Forefront Threat Management Gateway) Series:

    1. OWA
    2. EWS\Outlook anywhere
    3. Active sync
    4. SMTP